Configure Nginx Reverse Proxy in front of Authelia

This Authelia section started as a single page but became too large to manage. It is now split up into the following topics. This is the third section.
- Authelia for MFA on docker
- Deploying test hosts for Authelia MFA authentication
- This page: Configuring Nginx reverse proxy in front of Authelia
- Configuring Caddy reverse proxy in front of Authelia
- Logging in to Authelia
NGINX Proxy Manager deployment
I do not intend to work through the deployment of the NGINX Proxy Manager that I'll be using in this section. There are lots of guides out there already, and I'm not sure I can add anything regarding deployment. I will however work through the configuration for relevant sections for the Authelia deployment to function.
Pre-Requisites
Before I get into configuration steps, I think it is worth stating the prerequisites for this to function, these have been covered in previous parts, but some folk may land on this page without visiting the earlier pages.
All the following items should be in place, configured accordingly and functioning.
- Public DNS resolution for your three hostnames on your guide. Mine are Mine and will be deleted once this has been confirmed as working.
- If you are deploying on broadband, and wish to check from your own home network you will need to configure some internal DNS hosts pointing to your internal LAN IP Addresses.
- TCP-80 and TCP-443 forwarding if you are doing this in your home lab with Internet connectivity from a broadband supplier. If you are using one of the many public VPS (Virtual Private Server) then this is most likely not required.
- Authelia should be up and running listening to TCP-9091 on your host.
- The Notifier section for Authelia should be able to send public emails to your chosen email address for the user account. In my example I used Gmail.com
- You need two separate web based services to test the 1-factor, and 2-factor authentication. I have just spun up two separate apache web servers, but any other web app can be used as long as it is functioning. Simple is best when troubleshooting in my opinion.
Assuming all those are in place then we are good to go forward.
Configure the Authelia Proxy Host
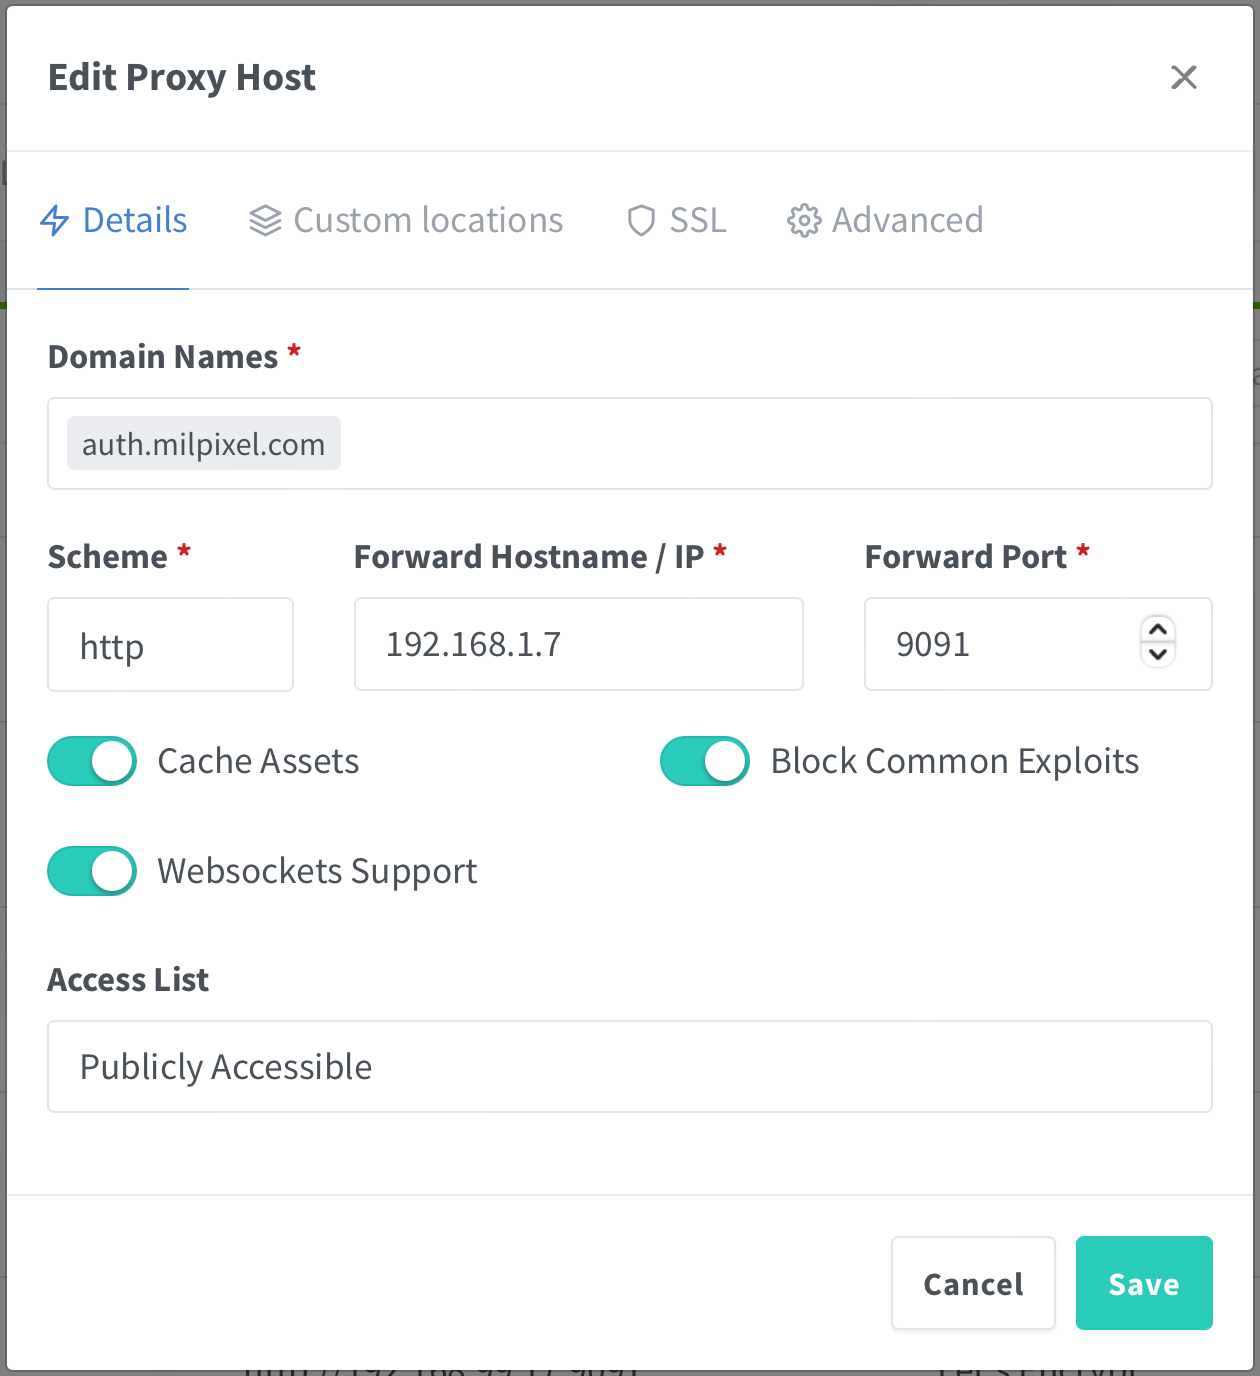
Within the Nginx Proxy Manager management portal, we need to add a new proxy host for the auth.milpixel.com hostname. Obviously your domain name will be different, and potentially the IP will need to be changed to match your deployment.
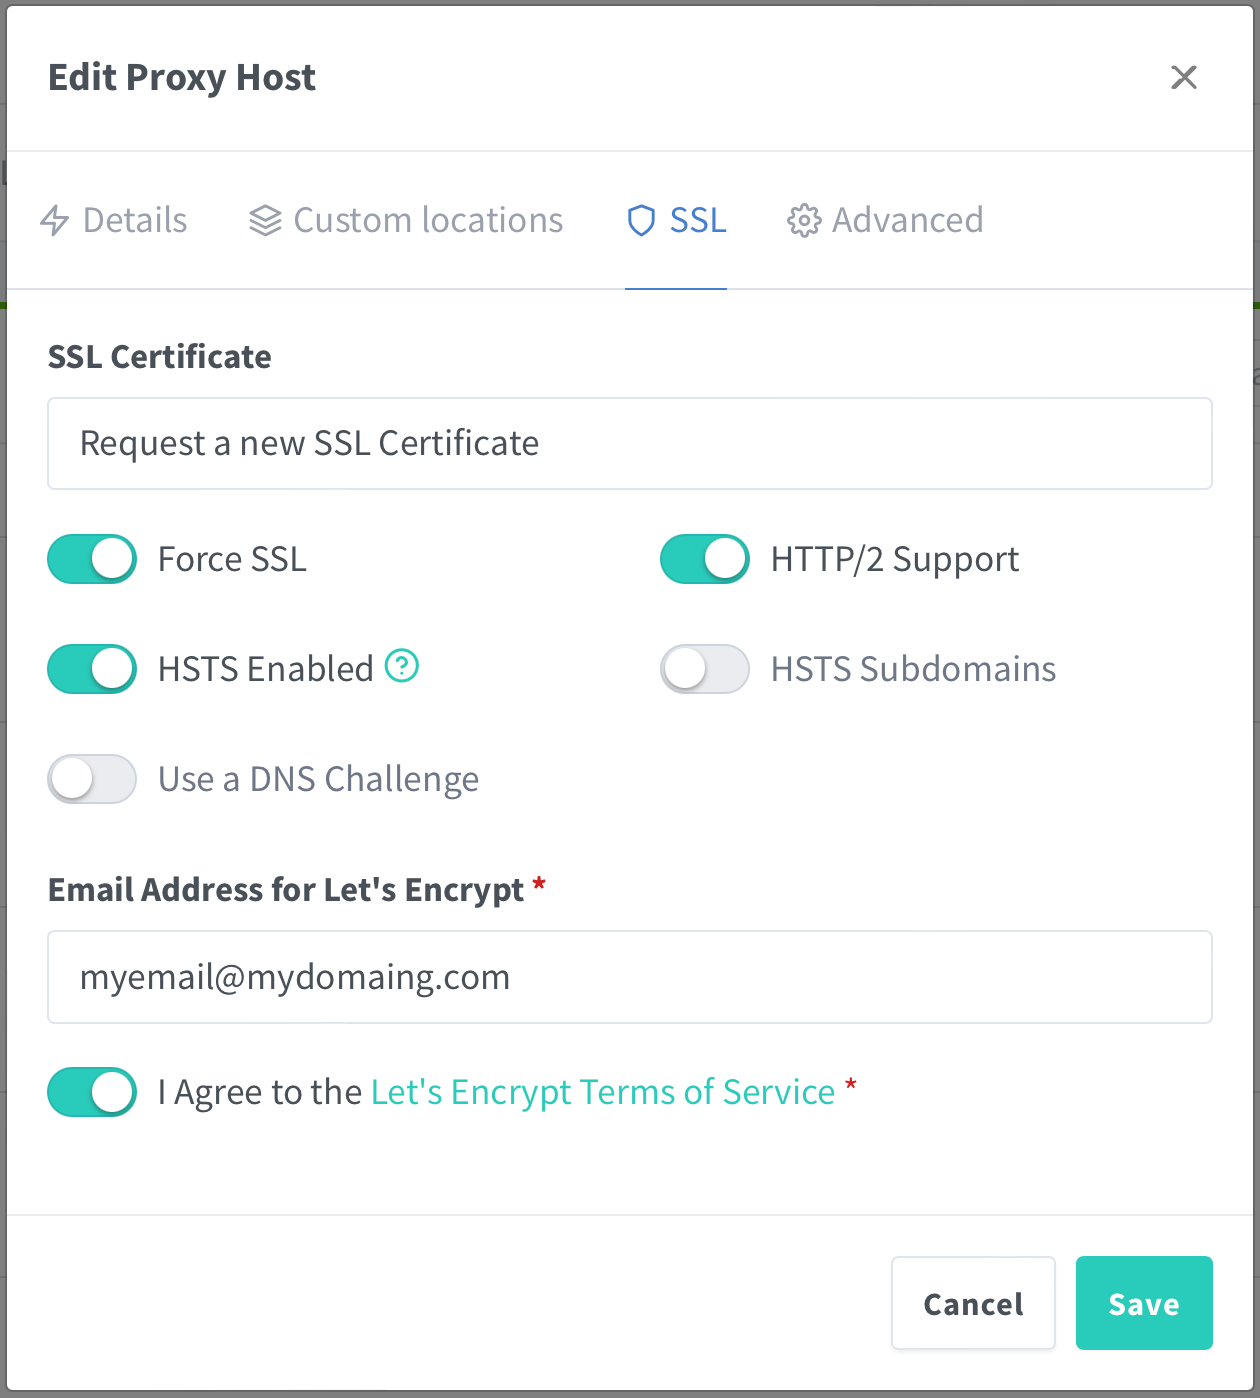
Moving onto the SSL tab
We can request a new Lets Encrypt certificate. I know it is possible to do the certificates at a higher level and let it cascade down to individual hosts, but I prefer to keep things simple. It also allows me to easily move individual services and associated domain names around at will.
So far this is all very simple stuff with nothing out of the ordinary. The Authelia customisation all happens in the advanced tab.
Custom Nginx Configuration in the Advanced tab
The following text below needs to be configured to suit your deployment and then pasted into the "Custom Nginx Configuration" section on the advanced tab.
The main element that needs changing in the text below is the 3rd line. Here you need to ensure it is your IP (that needs to be reachable from Nginx docker)
location / {
        #Your IP hosting Authelia should be below, this needs to be
        #reachable from the Nginx Proxy Manager host.
        set $upstream_authelia http://192.168.1.7:9091;
        proxy_pass $upstream_authelia;
        client_body_buffer_size 128k;

        #Timeout if the real server is dead
        proxy_next_upstream error timeout invalid_header http_500 http_502 http_503;

        # Advanced Proxy Config
        send_timeout 5m;
        proxy_read_timeout 360;
        proxy_send_timeout 360;
        proxy_connect_timeout 360;

        # Basic Proxy Config
        proxy_set_header Host $host;
        proxy_set_header X-Real-IP $remote_addr;
        proxy_set_header X-Forwarded-For $proxy_add_x_forwarded_for;
        proxy_set_header X-Forwarded-Proto $scheme;
        proxy_set_header X-Forwarded-Host $http_host;
        proxy_set_header X-Forwarded-Uri $request_uri;
        proxy_set_header X-Forwarded-Ssl on;
        proxy_redirect  http://  $scheme://;
        proxy_http_version 1.1;
        proxy_set_header Connection "";
        proxy_cache_bypass $cookie_session;
        proxy_no_cache $cookie_session;
        proxy_buffers 64 256k;

        # If behind reverse proxy, forwards the correct IP
        set_real_ip_from 10.0.0.0/8;
        set_real_ip_from 172.16.0.0/12;
        set_real_ip_from 192.168.0.0/16;
        set_real_ip_from fc00::/7;
        real_ip_header X-Forwarded-For;
        real_ip_recursive on;
    }
Once that has been entered in the "Custom Nginx Configuration" section, we can save it and move on.
Configure the 1-factor-WebSite.milpixel.com host
This first host will be used to test the 1 Factor functionality from Authelia. I'll skip over the first 2 sections for adding this host, as there are no real differences from any other proxied host. The significant difference is on the advanced tab.
Custom Nginx Configuration for 1-factor-WebSite
The text below needs to be saved in the Custom Nginx section of the Advanced tab. There is a little more to the host configurations when compared to the initial auth host config.
location /authelia {
    internal;
    #ADD YOUR IP AND PORT OF AUTHELIA BELOW
    set $upstream_authelia http://192.168.1.7:9091/api/verify;
    proxy_pass_request_body off;
    proxy_pass $upstream_authelia;
    proxy_set_header Content-Length "";

    # Timeout if the real server is dead
    proxy_next_upstream error timeout invalid_header http_500 http_502 http_503;
    client_body_buffer_size 128k;
    proxy_set_header Host $host;
    proxy_set_header X-Original-URL $scheme://$http_host$request_uri;
    proxy_set_header X-Real-IP $remote_addr;
    proxy_set_header X-Forwarded-For $remote_addr;
    proxy_set_header X-Forwarded-Proto $scheme;
    proxy_set_header X-Forwarded-Host $http_host;
    proxy_set_header X-Forwarded-Uri $request_uri;
    proxy_set_header X-Forwarded-Ssl on;
    proxy_redirect  http://  $scheme://;
    proxy_http_version 1.1;
    proxy_set_header Connection "";
    proxy_cache_bypass $cookie_session;
    proxy_no_cache $cookie_session;
    proxy_buffers 4 32k;

    send_timeout 5m;
    proxy_read_timeout 240;
    proxy_send_timeout 240;
    proxy_connect_timeout 240;
}

    location / {
        #CHANGE THE $upstream_?????? BELOW TO SUIT YOUR APP
        #CHANGE THE IP AND PORT OF WEB-APP BELOW
        set $upstream_1-factor http://192.168.1.7:8001;
        #CHANGE THE $upstream_1-factor BELOW TO SUIT YOUR APP
        proxy_pass $upstream_1-factor;
		auth_request /authelia;
		auth_request_set $target_url $scheme://$http_host$request_uri;
		auth_request_set $user $upstream_http_remote_user;
		auth_request_set $groups $upstream_http_remote_groups;
		proxy_set_header Remote-User $user;
		proxy_set_header Remote-Groups $groups;

        #CHANGE THE auth.milpixel.com BELOW TO YOUR DOMAINNAME
		error_page 401 =302 http://auth.milpixel.com/?rd=$target_url;

		client_body_buffer_size 128k;
		proxy_next_upstream error timeout invalid_header http_500 http_502 http_503;

		send_timeout 5m;
		proxy_read_timeout 360;
		proxy_send_timeout 360;
		proxy_connect_timeout 360;

		proxy_set_header Host $host;
		proxy_set_header X-Real-IP $remote_addr;
		proxy_set_header X-Forwarded-For $proxy_add_x_forwarded_for;
		proxy_set_header X-Forwarded-Proto $scheme;
		proxy_set_header X-Forwarded-Host $http_host;
		proxy_set_header X-Forwarded-Uri $request_uri;
		proxy_set_header X-Forwarded-Ssl on;
		proxy_redirect  http://  $scheme://;
		proxy_http_version 1.1;
		proxy_set_header Connection "";
		proxy_cache_bypass $cookie_session;
		proxy_no_cache $cookie_session;
		proxy_buffers 64 256k;

		set_real_ip_from 10.0.0.0/8;
		set_real_ip_from 172.16.0.0/12;
		set_real_ip_from 192.168.0.0/16;
		real_ip_header X-Forwarded-For;
		real_ip_recursive on;

    }
Configure the 2-factor-WebSite.milpixel.com host
This is almost the same as the 1-factor-websute.milpixel.com. The only differences are:
- The host to be proxied
- The target IP and/or Port
- Under the "location /" section in the Custom Nginx section of the Advanced tab:
- 3 occasions of $upstream_1-factor should be changed accordingly
Nginx Proxy Manager Checks
Finally check that everything looks OK, and is green in Nginx Proxy Manager:

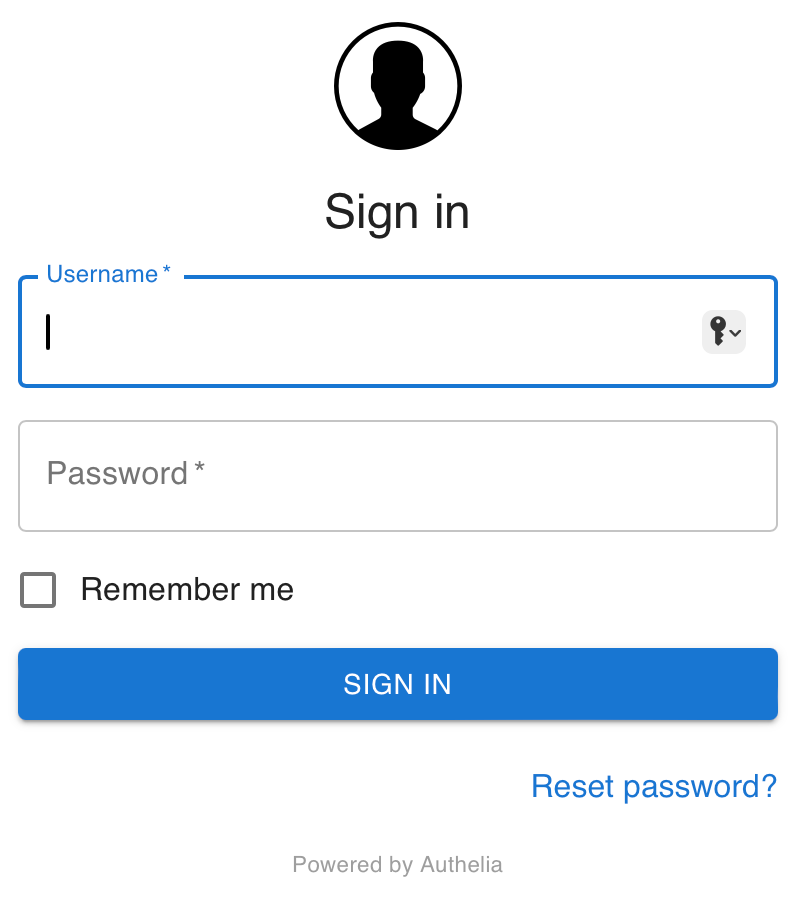
Now that the proxy hosts are configured, deployed and Online we can continue by opening up a browser session to https://auth.milpixel.com. When we do that we are presented with a sign in page.
Now we have Nginx Proxy Manager configured to point to Authelia we can move on. If you prefer to use Caddy then number 4 below provides the details required. Otherwise we can skip to 5 and log in to Authelia.